How to Get your Lawn Mower Ready for Spring

Mower Tune Up Blog

5 Easy Steps for Tuning up Your Lawn Mower

Last weekend, the weather warmed up enough for me to celebrate with my First Mow of the spring!  I pulled the lawn mower out of the garage, and pulled the string, only to find it wouldn’t start… After a long winter of sitting in the garage, my mower wasn’t ready to take on the task at hand.  That means it’s time for a tune up!

Even if your lawn mower is running fine, annual tune ups can prevent costly repairs, increase your engine life and improve your fuel economy by 33 percent!  Here are five steps for tuning up your lawn mower and getting ready for spring!

Change the Oil

After a long winter, if your lawn mower won’t start, the first thing to check is the oil.  It’s usually a good idea to change the oil in your lawn mower at least one time each year.  If your oil needs to be changed, here are three steps to change your oil.

  1. First, before messing with your lawn mower, be sure to REMOVE THE SPARK PLUG WIRE.  That will ensure that your mower doesn’t accidentally start up while you’re in there working on it.
  2. Next, remove the drain plug and tilt the mower back to empty the old oil.  Be sure the gas cap is on tight, or remove the gas in order to avoid spills.
  3. Refill the mower with the new oil.  Make sure you don’t put too much oil in.  Most mowers hold 18-20 ounces of oil.  If your lawn mower has a dipstick, use that to check the level.

Check the Gas

It’s usually a good idea to start each mowing season with a fresh tank of gas.  Keep that in mind this fall, before you put your mower away for the season.  Let your gas run out or empty the tank before storing it for the winter.  In the winter, condensation can build up in the tank and gas line and freeze, which can lead to bigger issues.  Using fresh gas can make sure your lawn mower starts right up.

air filterCheck the Air Filter

The next step in tuning up your lawn mower is checking the air filter.  If you have a paper filter, it will probably need to be changed at least once per year.  If your air filter is gray or brown, then it’s time to change it.  New air filters an extremely inexpensive way to be sure your mower is running at it’s top performance.  New air filters increase fuel efficiency, reduce emissions, and extend your engine life.

If you have a foam filter or pre-filter, you can also rinse it out with soap and water.

sparkplugChange the Spark Plug

If, like me, you go to start your lawn mower in the spring and it won’t start, there’s a good chance it’s the spark plug.  On the bright side, sparkplugs are also a cheap and easy fix.  If the tip of your spark plug is black or dark, then you could probably use a new spark plug.

All you have to do is use a socket wrench to remove the old spark plug, and replace it with the new one.  Make sure you purchase the correct spark plug by taking it into your local dealer or checking out this online lawn mower parts store.  There’s a good chance that after switching out your spark plug, it will start right up!

bladesChange or Sharpen Blades

Another aspect of tuning up your lawn mower is checking your blades.  Before mowing, make sure your blades are balanced, sharp, and free of nicks and damage.  Balanced lawn mower blades will make your lawn look as great as it can be!

If you need to change your lawn mower blade, tilt the mower so you can easily get to the bottom of the deck.  Again, be sure to UNPLUG THE SPARK PLUG CABLE, and WEAR GLOVES!  With a socket wrench, take out the bolt that’s holding your blade to the mount.  Also, make sure to clean out the bottom of your mower deck of any grass or debris.

When putting the new blade on, pay attention to the direction and position of your blade.  Make sure it’s the same position as your old blade.  Use a socket wrench to attach the new blade.

After you follow these 5 steps, your lawn mower should be all tuned up and ready to take on anything you throw at it this summer!

Choosing the Right Grass

right grassWhich Grass is Best for your Lawn?

Last week, I talked about how overseeding your lawn can help keep your lawn thick, full and green.  Whether you’re planting grass seed for the first time or overseeding, choosing the right grass is an important part of lawn care.  When it comes to proper grass growth and lawncare, choosing the right grass is key.  But there are so many grass types out there, how am I supposed to know which grass is best for my lawn?  If you’re having trouble deciding which grass to use, here is a guide to help you narrow it down.

Climate Zones

The most important aspect of choosing the right grass is your climate zone.  The climate zone in which you live has a direct impact on how well certain grass types.  Some grasses are recommended for certain climates, while other grasses flourish in other climates.  In order to choose the right grass, it helps to split the country into three different geographical regions.  Cool season, transitional and warm season zones.  Look at the map to figure out which zone you lie in.

Grass-type-season-in-USA

Cool Season Grasses:

If you happen to live in a cool season zone, there are a few grasses that are recommended specifically for your area.  These grasses have been found to yield the best growth in Northern areas:

kentucky bgKentucky Bluegrass: 

Pros:  Kentucky Bluegrass is one of the more popular grass types found in cool season zones.  Kentucky Bluegrass has a deep green color and a very desirable texture.  It is typically able to withstand extreme temperatures which makes it a solid choice for areas with extremely hot summers and cold winters.  Kentucky bluegrass is a low maintenance grass with resilient properties. It’s known as a “creeping grass,” which means it can usually repair itself without having to reseed.

Cons: Really, the only problem with Kentucky Bluegrass is that it has a tendency to lie dormant during hot seasons, which turns it an unhealthy, brown shade.  It’s also usually pretty weak in extremely wet and shady areas.

Conclusion:  When using bluegrass in your lawn, the germination process might take up to three weeks.  This means it’s usually best to use a blend of one or two other grasses.  Ryegrass and fescue both fill in quickly.  If you are using Kentucky Bluegrass in your lawn, blend it with a mixture of Fine Fescue. (Especially if you are planting seed in a shady or wet area.  The best time to plant Kentucky Bluegrass is late summer to early fall, when the temperature falls to 75 Degrees.

Perennial Ryegrass:

Pros: Perennial Ryegrass is another great choice for cool season zones.  It’s a very diverse grass, allowing it to flourish in a wide variety of soils.  It can also handle heavy foot traffic.  Perennial Ryegrass is a fine textured, bright green grass.  Compared to Kentucky Bluegrass, the germination process of ryegrass is much shorter, at only about a week.  Perennial Ryegrass is especially popular in coastal regions with mild winters and cool summers.

Cons: Perennial Ryegrass usually has a low tolerance for cold weather and droughts.  It’s also a pretty high maintenance grass to take care of.

Conclusion:  Because of it’s inability to thrive in extemely cold weather, it’s best to use Perennial Ryegrass as a blend of one or two more grasses.  It’s a very quick growing grass, which allows it to protect other slower growing grasses in your mixture.  Just keep the blend of ryegrass under 20% , especially if you live in an area that is prone to cold winters and droughts.

Fine Fescue:

Pros:  Fine Fescue is a great looking, dark green bunchgrass.  Most fescues grow very well in shady areas and soils with low acidic levels.  Fine fescues are also a pretty low maintenance grass — they don’t require much fertilizer or close care.  Fine Fescue is great at handling droughts and shady regions.

Cons: Fine Fescue is not a great grass choice for areas with hot climates or heavy foot traffic.

Conclusion:  Fine Fescue is best to use in a blend of Ryegrass or Bluegrass.  The best time to plant Fescue is late summer to early fall, when the temperature is between 60-75 degrees.

Warm Season and Transitional Zone Grasses

As opposed to cool season grasses, transitional and warm season grasses call for a different type of grass.  When deciding on a grass for warm season or transitional zones, the following grasses have been found to grow the best in your area.  Try using one of the following, or even use a blend of each.

Zoysia:

Pros:  Zoysia is known for being a durable and versatile grass.  It’s got a deep root system that allows it to withstand heat, drought and a variety of soil conditions.  The deeper root system also allows for optimum resiliency to pests and diseases.  Zoysia grows in very thick and lush, with a medium texture.

Cons:  Zoysia tends to turn a brownish color in the fall.  It’s also pretty high maintenance because it’s difficult to mow and prone to thatch.

Conclusion:  When it comes to southern climates and transitional zones, zoysia is a great grass choice.  However, it has a long germination period.  It could possibly take zoysia up to two years to come in thick and full, but once it does, weeds and diseases can rarely penetrate it.  Use zoysia in a blend of other grasses such as bermuda, and be sure to keep it properly dethatched.  At least once per year, run a dethatcher over zoysia grass in order to keep it healthy.

Celebration-BermudaBermuda Grass:

Pros: Bermuda Grass is the most common type of grass used in souther, warm season climate zones.  Similar to Zoysia, Bermuda Grass has a deep root system that allows it to handle extreme conditions like excess heat and sun exposure.  Bermuda Grass grows in much quicker than zoysia grass, which makes it a great choice for quickly filling in damaged areas.

Cons:  On the other hand, bermuda grass is also prone to losing its color after periods of frost.  It also forms a thick layer of thatch, and doesn’t grow very well in shady areas.

Conclusion:  Because Bermuda grass tends to turn brown after experiencing frost, it’s usually a good idea to overseed Bermuda grass in the fall or early winter.  The best time to plant Bermuda grass is late spring to early summer, when grass growth is at it’s maximum.

Whichever grass you decide on, keeping your lawn properly aerated and dethatched is just as important as choosing the right grass.  With a little care, complete Turf Renovation is only a few steps away.

How to Get Green Grass Part 3: Overseeding

overseedingWhy You Should Overseed Your Yard

With summer in the air, now is the time to begin thinking about your lawn.  If your grass is dry, patchy and brown, you’re not alone.  Fortunately, complete turf renovation is not as hard as you might think.  By following these three steps, you will be well on your way to having beautiful, green, golf course quality grass.

  1. Dethatching
  2. Aerating
  3. Overseeding

Last week, we talked about the importance of aerating your yard.  Once your yard is properly aerated, then the third and final step in achieving a beautiful, green lawn is overseeding.  In this article, we’ll talk about what overseeding is, how it can help your lawn, and how to properly overseed.

seedingWhat is Overseeding?

If your lawn is patchy, brown and dry, it might be because the grass has actually died out.  When you overseed, you plant grass seed directly over your existing turf.  Overseeding is a simple way to fill in dead or thin spots of grass, giving you a thicker, more green lawn. Overseeding can be done with either a spreader or an overseeder.

The Benefits of Overseeding

Many types of grass (especially cool season grasses) typically lie dormant or can even die in hot weather or when exposed to excess sunlight.  Because of this state of dormancy, grass turns a brown, unhealthy shade.

Overseeding is the easiest and most effective way to allow that rich, green color to be returned to your yard.  Overseeding will also make your turf thicker, healthier, and less prone to weeds.

How to Overseed your Yard

If your yard has spots of discoloration or poor growth, you could probably benefit from overseeding.  In order to grow thick, healthy grass, and get the most out of your grass seed, seed to soil contact is key.  Because of this, the best time for overseeding is right after your yard has been aerated.  Aerating before overseeding will help the grass take root and germinate more quickly.

Before you overseed, you have to choose which type of grass you would like to grow.  The most important factor in choosing the right grass is climate zone.  The map below breaks the country down into three groups:  cool-season zone, transitional zone, and warm-season zone.

Grass-type-season-in-USA

Check out the map, and whichever zone you are in will help you determine which grass is best for your region.  If you’re in the cool season region, popular choices are Kentucky Bluegrass, Perennial Ryegrass and Fescues.  However, if you’re in a warm season region, Zoysia and Bermudagrass are both great choices.

When planting grass seed, one common practice is to use a blend of two or three different types of grass.  For example, bluegrass is a great grass for cool season zones, but it can take up to three weeks to germinate.  Because of this, adding some fescue in your bluegrass can help the growing process because fescues only take about a week to germinate.  The fescue will protect the sensitive bluegrass seeds from the elements until they get a chance to germinate.

Once you choose the perfect grass combination, it’s time to overseed.  Go over your lawn thoroughly with a spreader or an overseeder.  After you overseed, gently go over your yard with a rake in order to allow the seeds to settle in.  After you have done both of these steps, then you can begin to water your lawn.

Well, that about does it for our turf renovation series.  Thanks for reading, and hopefully after you follow these simple steps you will be on your way to having the greatest looking lawn on the block!  Feel free to share some pictures of your newly beautiful lawn!

How to Get Green Grass Part 2: Aerating

aerating blog2

The Importance of Aerating Your Yard

Let’s face it — at some point in your adult life, you have probably dreamt about having the perfect lawn.  Wouldn’t it be great to have the best lawn in the neighborhood?  Well, A perfectly manicured, beautifully green yard is completely achievable.  If your lawn is dry, brown and patch, don’t worry — complete turf renovation is only three steps away!

  1. Dethatching
  2. Aerating
  3. Overseeding

Last week, I covered the importance of dethatching your yard.  Once your yard is clear of any harmful thatch, then you’re ready for the next step — aerating!  This week, I’m going to tell you everything you need to know about aerating your lawn, including: why aerating is important, and how to aerate properly.

tow behind aeratorWhat is Aerating?

Aerating your lawn is arguably one of the most important elements in achieving lush, beautiful grass.  Depending on the amount of foot traffic your lawn receives, your turf has put up with a lot of compaction over the years.  Due to lots of traffic and heavy use, your soil gradually becomes more and more compacted.  Because of this, most lawns could benefit from being aerated at least one time per year.

The process of aerating your lawn not only slows down the effects of compaction, but it actually reverses it!  When you aerate, you are essentially making many tiny holes in your turf.  There are two popular types aerators — spike aerators and plug aerators.  Spike aerators are constructed of a lot of tiny spikes that cut holes in your turf, while plug aerators cut wider and deeper holes, removing larger chunks of soil (plugs).  Both spike and plug aerators are available in walk-behind  (for smaller areas) or tow behind models (for larger yards.)

The Importance of Aerating

Over time, soil compaction makes it hard for soil to receive necessary nutrients like water and air.  One of the most beneficial things you can do for your lawn is to let it breathe properly.  Just like any other organisms, your turf’s ability to breathe easily has a direct effect on healthy growth.  Aerating your lawn removes pressure that inhibits your soil from breathing properly. soil_compaction_001

After aerating, you will soon notice your yard growing thick, green and healthy.  This is because aerating increases the amounts of oxygen and essential nutrients that your soil can take in.  Aerating promotes healthy soil by stimulating root growth, which will improve the overall health and appearance of your lawn.

aeratorHow to Aerate

Now that you know why you should aerate, let’s talk about how to aerate properly.  Before you aerate, make sure that the soil is moist.  This not only makes aerating easier, but it also allows the tines to deeper penetrate the soil.  It’s best to aerate after a light rain.  If that’s not possible, just make sure to water your lawn the day before.

After your yard is properly water and ready to be aerated, pass over your entire yard with an aerator.  If you’re going to be overseeding your lawn, a good time to overseed is right after aerating.  This helps to make sure that the grass seeds penetrate the soil and germinate properly.  After aerating, be sure to water your yard again the day after in order to make the most out of your hard work.

When to Aerate

If you’re going to aerate, be sure to do it during a period of active growth in your lawn.  This time varies depending on a few things: mainly type of grass and climate zone.  For warmer season grasses like Bermudagrass, the best time to aerate is late spring to early summer.  But for cool season grasses like Kentucky Bluegrass, aerating your yard in the late summer to early fall will help to best promote healthy growth.

Stick around, next week I’ll be talking about the third and final step in turf renovation — overseeding.

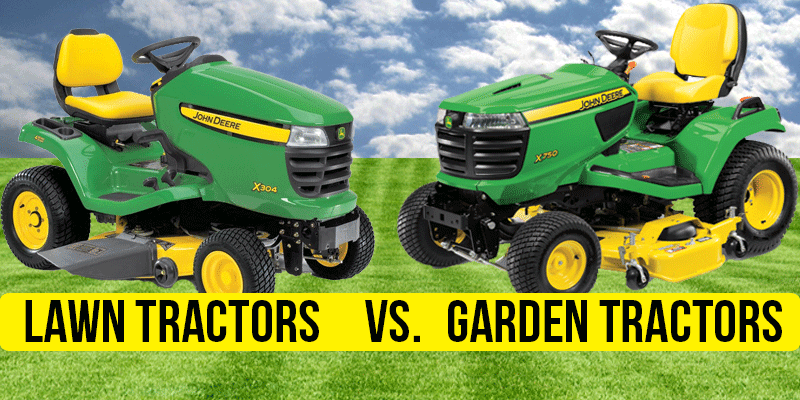
What’s the Difference Between a Lawn Tractor and a Garden Tractor?

lawn-tractor-vs-garden-blog

The Difference between Lawn Tractors and Garden Tractors

If you’re in need of a riding lawn mower, you may not know what to look for.  There are basically two types of riding mowers; lawn tractors and garden tractors.  In order to decide which one is best for you, you first need to know the difference between the two.  In this guide, we’ll talk about some of the key difference between lawn and garden tractors; specifically size, function, power and cost.

Size:

To the untrained eye, a lawn tractor and a garden tractor may appear to be exactly the same.  The truth is, they are very similar.  However, one of the most obvious visible difference is that garden tractors tend to be larger than lawn tractors.  Garden tractors typically have larger, more powerful engines and transmissions — which means that they require a bigger housing to hold the larger components.  Garden tractors are also often used for more heavy-duty tasks such as hauling material, which means that they tend to weigh more.

Because garden tractors are designed to handle heavy attachments, they also have larger rear drive wheels than lawn tractors.  But this also means that lawn tractors have better maneuverability around tight turns and obstacles.

  • Garden tractors weigh more, which means they are better at handling hilly terrain.
  • Lawn tractors have smaller drive wheels for better maneuverability.
  • Garden tractors are usually larger, sturdier and heavier than lawn tractors.

Function:

When shopping for a tractor, the main question you need to ask yourself is, “What will you be using your tractor for?”  The biggest difference between lawn tractors and garden tractors is their intended functions.
Garden tractors tend to be more sturdy and heavy duty.  Because of this garden tractors are great for hauling material and attaching implements.  Not only can garden tractors mow a lawn, but they can also be used to move snow, till a garden, fertilize your yard, and more.  On the other hand, lawn tractors are limited in their uses.
  •  Garden Tractors are made to handle a wide variety of attachments.
  • Garden Tractors have a more heavy-duty build, for a more versatile machine.
X324-bagger garden-mulch
John Deere X300 Lawn Tractor John Deere X700 Garden Tractor

Power:

Another one of the biggest difference between a lawn tractor and a garden tractor isn’t as obvious.  It’s actually found under the hood.  Because garden tractors are meant to be a more versatile tractor, they require more horsepower.  On the other hand, lawn tractors are primarily used for mowing, which requires much less horsepower.

One of the most important differences between lawn tractors and garden tractors is that garden tractors typically come with a locking differential.  Differential locks help the user to provide traction if you’re ever operating in less than ideal terrain.  Locking differentials can certainly help get you out of messy situations.  When you activate the differential lock, the rear drive wheel’s rotational speed is restricted so that both wheels are turning at the same speed.  When both wheels are turning in unison this allows the wheels to maintain even ground contact, giving you more traction.

  • Lawn tractors typically have less horsepower (15-25 HP), while garden tractors usually have higher horsepower (20-30 HP).
  • Most garden tractors come equipped with locking differentials, which gives you better traction.

Cost:

As with any big purchase, when deciding between a lawn tractor or a garden tractor, cost is certainly a factor.  Keep in mind that because garden tractors are more versatile and heavy duty, garden tractors will typically cost more than lawn tractors.  But don’t forget, there’s always the option to buy used lawn and garden tractors.  That will surely be an inexpensive way to get the job done.

Lawn Tractor or Garden Tractor?

If you’re still not sure which tractor would be the best fit for you and your needs, here are a few key points to consider:

Power: Garden tractors a powerful machines, built to handle anything you throw at it.  This means garden tractors will typically have higher horsepower and a differential lock for handling tough terrain.

Cost: Because of their heavy-duty construction and more powerful engines and transmissions, garden tractors usually cost more than lawn tractors.

Functionality: If your primary need is mowing, then a lawn tractor will get the job done quickly, efficiently, and affordably.  However, if you’re going to be using your tractor for more jobs besides mowing, then you will need the extra power and versatility that garden tractors have to offer.

How to Get Green Grass – Part One: Dethatching

dethatching blog

How Dethatching Can Help you Achieve Green, Golf Course Quality Grass

I’m sure, at some point or another, most of us have envisioned having the perfect yard.  The best looking lawn on the block.  The talk of the town — lush, green and beautiful.  But if your yard is looking brown, dry, and dead, you aren’t alone.  Last week, I talked about how you can achieve the beautiful yard of your dreams in four easy steps.

  1. Dethatching
  2. Vacuuming
  3. Aerating
  4. Overseeding

This week, I’ll walk you through the first step — dethatching your yard.  I’ll also talk about the importance of dethatching and how properly dethatching can help your grass become on par with golf course grass.  (Pun absolutely intended.)

thatch detail

What is Thatch?

Thatch is that organic layer of dead grass, roots, and stems that can build up between the soil surface and layer of vegetation in your turf.  Thatch is created when your turf produces debris faster than it can be broken down.  Thatch tends to build up after time, which prevents water, oxygen, and essential nutrients from reaching your soil.

When you dethatch your yard, you are essentially combing your yard with a rake, removing that unhealthy layer of thatch.  When it comes to smaller yards, this can be done with simply a rake.  But if your yard is bigger than half an acre to an acre, a dethatcher will help you to save lots of time and energy.  Popular types of dethatchers include walk-behind dethatchers  and pull-behind dethatchers (to pull behind a riding mower.)

Why should I dethatch my yard?

It kind of makes sense that a thin layer of thatch is actually healthy for a lawn — it acts as a sponge to help hold in moisture, and also helps to protect the grass from excess sun.  But when thatch buildup becomes greater than .5″, thatch can hold in nutrients and water, keeping them from reaching the soil.  Because of this, too much thatch buildup stifles growth, turns your grass an unhealthy brown shade, and literally chokes your lawn.

If thatch continues to grow too thick, it can also block sunlight from reaching lower grass blades, and prevent water from soaking into the root system.  If water can’t reach the root system, it will continue to hold moisture in the grass blades, which causes bacteria and disease.

dethatchingHow do I dethatch my yard?

In order to tell if your yard needs to be dethatched, first dig up a small plug of turf.  Using a spade, cut a small section of turn (roughly 3″ deep) and inspect the layer of thatch – (the layer right between the soil and grass blades.)  If the layer of thatch exceeds 3/4″, that means your yard could greatly benefit from being dethatched.

The first step in dethatching your yard is mowing.  Mow your yard about half of the normal height – (but no less than an inch.)  Once your yard is freshly cut, then it’s time to dethatch.  Using a rake (for smaller yards) or a dethatcher, go over your yard, pulling out the thatch layer.  Dethatching creates a layer of dead grass on top of your lawn, which means that removing the thatch with a rake or lawn vacuum is absolutely necessary.  If you don’t vacuum after dethatching, then it’s only a matter of time before the dead thatch becomes matted down in the soil again.

Often times, dethatching can create bare spots in your yard.  Because of this, it’s a pretty good idea to overseed after dethatching — especially in problem areas.

When Should I Dethatch?

Finding the best time to dethatch really depends on climate region and grass type.  When maintaining cool-season grasses, the best time to dethatch is late summer or early fall.  But when it comes to warm season grasses, dethatching yields the best results when done in late spring or early summer.  Really, the best time to dethatch varies by region.  If you’re not sure, just keep in mind that the best time to dethatch would be whenever your grass is growing most rapidly.